During my final semester at Fanshawe College, I participated in a group assignment focused on creating a game centered around the main mechanic of "wire travel." Within the team, my responsibilities included developing the main menu functionality and artwork, designing Level 1, and crafting the final credit scene for the game.
Genre: 3D Platformer
Engine: Unity
Team Size: 5 People
Full Playthrough of the game
Production Process
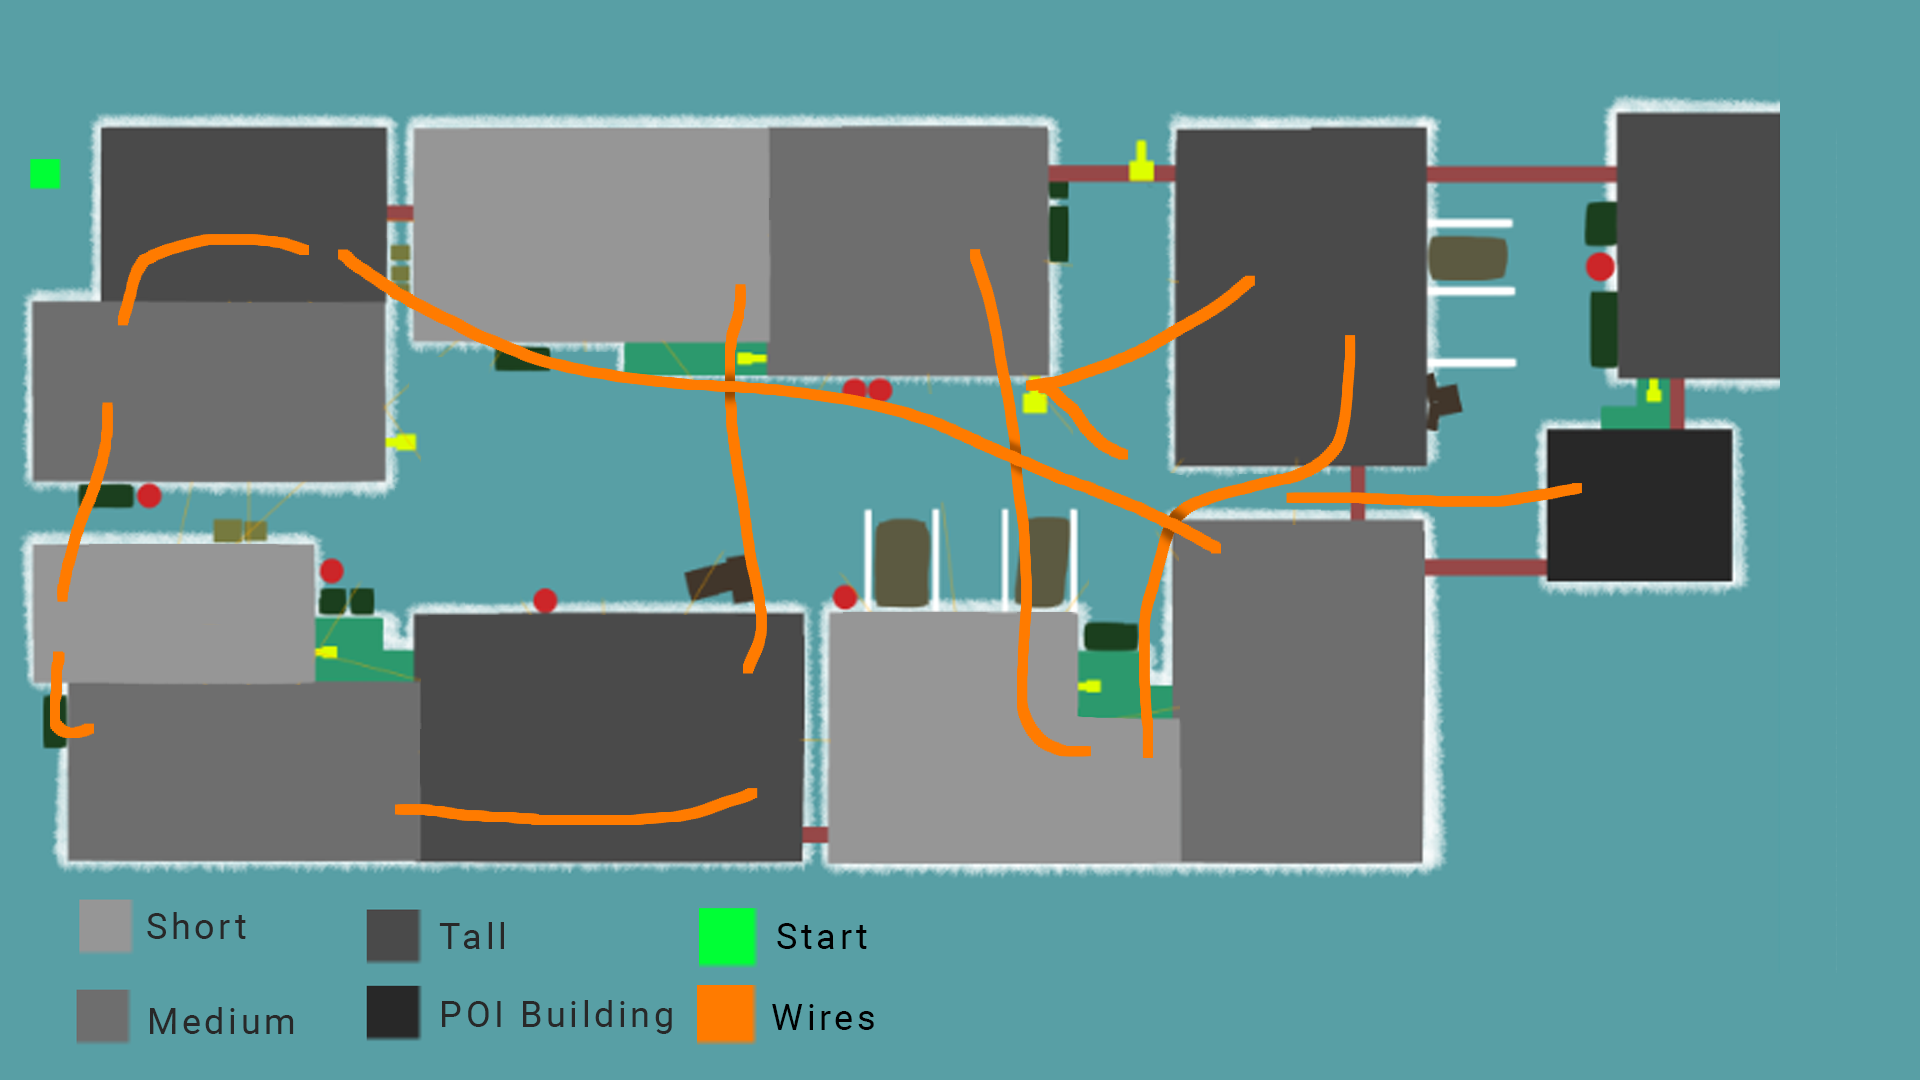
Level Layout
I aimed to create an authentic urban alleyway vibe for this level and challenged myself by keeping the play area compact while making the most of the rooftop spaces to make it feel bigger.
You'll start the level at the green square in the top left corner, where you'll pick up the package you need to deliver.
After grabbing the package, you'll head into the alley to begin your adventure! In the alley, your goal is to reach the other end where you'll learn how to wall jump up to the rooftops.
Once on the rooftops, you'll master the main gameplay mechanic: wire travel. This will help you get back to the building on the far left, and then you'll navigate from rooftop to rooftop until you reach the point of interest (POI) building.
First Block out
From the initial concept to the pre-production phase, we've made several changes to the level's design to enhance its appeal and engagement.
Firstly, we added an obstacle blocking access to the back alleys until the player picks up the package. This ensures players complete the first task before moving on.
Next, we included a cutscene in the alley to show players that their main goal is to reach the tallest building on the far side of the map. After the cutscene, players encounter a trailer blocking their path, encouraging them to problem-solve and discover the solution. This section also serves as an introduction to the wire travel mechanic.
Lastly, we noticed that initially, it's not clear to players that they can jump between two nearby buildings. We'll address this in later development stages.
Checkpoint System
Originally, the checkpoint system was envisioned as a soccer net where players kick a ball to set their spawn point. While this idea was enjoyable and encouraged players to engage in a "side quest," it lacked thematic coherence.
Therefore, it was revised to a breaker box that players can access via a wire traversal. This updated system serves multiple purposes
- Establishes the player's checkpoint at the location.
- Activates a new pathway by deactivating the wires they just traversed and illuminating a new route.
- Controls the lightbulbs atop to align with the corresponding wires.
This pivot not only addresses thematic concerns but also enhances player direction throughout the game. Players can now visually discern their next "waypoint," and as they progress, the subsequent path to follow becomes illuminated.
When the player activates a breaker it shuts off the previous wire and turns on the path in front of you to allow the player to progress through the level and help prevent backtracking.

When a new breaker box is activated, it establishes a checkpoint for the player. In the event of player death or damage, they will respawn at the most recently activated breaker box.
Level Iterations (Package Pickup)
The level begins as players collect the package from the counter and venture into the alleyway. Two issues need addressing in this segment: the package's visibility and the clarity of the next objective after obtaining it.
Initially, the package was easily overlooked, blending into the environment. To enhance its visibility, I added animation to the package, causing it to bob up and down while rotating. Additionally, I outlined the package to create a higher contrast with the shop surroundings, ensuring it stands out more prominently.
Furthermore, players were uncertain about their next steps after acquiring the package. To provide clear direction, I introduced a short cutscene showcasing the gate opening to reveal the next area, guiding players on their intended path forward.
Level Iteration (Trailer)
Just after entering the alleyway, players catch a glimpse of the level's final destination while also being introduced to the wire travel mechanic.
Initially, players struggled to notice the wire concealed beneath the truck and were unsure of the controls required to utilize it.
To address these challenges, I devised several solutions:
1. I relocated the wire connection from under the truck to a light pole positioned on the right side of the alleyway. This provides a logical power source for the wire and enhances its visibility, aided by the light pole's illumination, thereby guiding the player's attention towards it.
2. In the cutscene revealing the final building, a pan to the trailer highlights the controls necessary for wire travel. Additionally, this angle allows players to observe the wire extending to the right of the screen, further reinforcing its presence and functionality.
Level Iterations (Wall Jump)
This wall jump section has proven to be the most challenging in terms of guiding player direction, particularly due to the limited communication method of graffiti for explaining game controls.
Initially, the graffiti in this section consisted of the same decal used twice, attempting to convey the message "Hey, you can jump and then jump again." However, this approach proved ineffective, often requiring additional explanation during playtesting sessions or relying on players discovering the mechanic accidentally rather than intentionally.
To address these issues, I implemented the following solutions:
1. Created a unique decal illustrating a wall jump diagram to demonstrate the required action in this section.
2. Enhanced the design of the building on the right side to provide a more forgiving experience for players who struggle to reach the top of the wall in one attempt. Now, there's a small ledge as a "safety net" where players can land if they don't make it all the way up on their first try.
2. Enhanced the design of the building on the right side to provide a more forgiving experience for players who struggle to reach the top of the wall in one attempt. Now, there's a small ledge as a "safety net" where players can land if they don't make it all the way up on their first try.
Tutorial Iterations
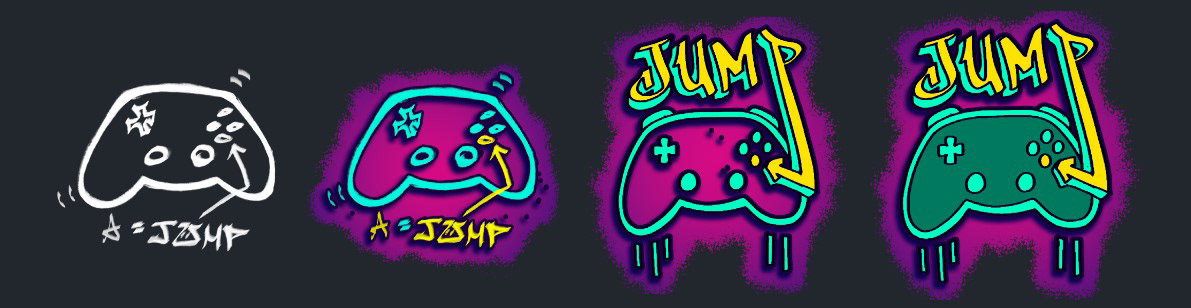
Here's an example of the iterative process applied to the tutorial graffiti in the game:
- The far left image represents the initial iteration of the graffiti. Players struggled to notice this version, particularly against walls of similar color.
- To address this, I introduced color variations and highlighted the crucial information (such as which button to press and its function). However, readability remained an issue due to the somewhat messy line work.
- The third iteration improved upon this by refining the line work, resulting in a cleaner appearance. Additionally, I utilized the graffiti style for the text to make it stand out more.
- The only feedback received from my professor was to add a fill-in color to the inside of the controller, enhancing readability. This adjustment marked the conclusion of the iteration process.